KeePass - Password Safe
KeePass is a free open source password manager, which helps you to manage your passwords in a secure way. You can store all your passwords in one database, which is locked with a master key. So you only have to remember one single master key to unlock the whole database. It can be shared, used on multiple devices while being secure.
It was first build on Windows and now supports also macOS and Linux operating systems through the use of Mono.
- KeePass 2.x id the original Windows application.
- KeePass/L a Linux fork not needing the Mono framework.
- KeePassX (continue of KeePass/L) is a multi platform version using QT.
- KeePassXC (community fork of KeePassX) is now the active alternative version to the original.
While KeePassXC runs natively on all operating systems that's what should be used on Linux.
All in all KeePass is a good selection to store your passwords in a encrypted file which can also be stored on the network. It is also integrated to the browser for easy password access. IOS and Android apps to use the same database are also available.
Installation of KeePassXC
You will find this as package and can directly install it in your packages.
$ sudo pacman -S keepassxc
$ sudo apt-get install keepassxc
See the following description for the setup and configuration.
FTP Access
As KeePassXC has no support for any protocol (only local file) you need to make the sync on your own. In Linux that should be no Problem as you can mount anything to the local filesystem. The easiest and often possible way to share your database is to use an FTP server. KeePass2 and the Android app can use it directly, while in KeePassXC under Linux you have to mount the remote FTP site first.
Attention
The following solution will only work for KeePassXC V2.6 or later. For Ubuntu 20.4 you have to add the launchpad repository:
sudo add-apt-repository ppa:phoerious/keepassxc
sudo apt update
sudo apt upgrade
$ sudo apt update
$ sudo apt-get install curlftpfs
$ sudo pacman -S curlftpfs
Now to mount a ftp share automatically use through fstab ro the following:
-
Create the local directory
This is the directory there you later access the remote path.
$ sudo mkdir /mnt/ftp-<share> -
Create credentials file
For security reasons don't add the credentials within readable file, so better make a special credentials file under
/root/.netrcwith the following content:machine <ftp-host> login <ftp-user> password <ftp-password>You may also add multiple lines if needed. Now make sure the file has the correct rights:
$ sudo chmod 600 /root/.netrc -
Add entry to
/etc/fstabCheck
uidandgidof your non-root user which will use the share:$ id uid=1000(alex) gid=1000(alex) Gruppen=1000(alex),3(sys),90(network),98(power),991(lp),998(wheel)Now add the following line to
/etc/fstabbut use also use your uid and gid from above:curlftpfs#<ftp-host> /mnt/ftp-<share> fuse allow_other,uid=1000,gid=1000,umask=0022,noauto,x-systemd.automount 0 0The
noautotells it not to mount the drive at boot (to not block boot sequence if network not available). And thex-systemd.automounttells it to mount the drive on first access instead. By then your wireless will be up and you won't get the mount failure. You can also specifyx-systemd.idle-timeout=60to unmount after a specified idle time.Attention
Keep in mind that the automount only work after a reboot or if you start the daemon by yourself:
sudo systemctl daemon-reload sudo systemctl start mnt-ftpxxxx.automount -
Mount the directory:
$ mount /mnt/ftp-<share> $ ls /mnt/ftp-<share> -
Check your KeePassXC's saving settings:
KeePassXC offers two alternative saving methods : a direct mode (data is directly written in the database's kbdx file), or a more secured indirect mode (data is written in a temporary file, and then this temporary file will crush the database's kbdx file). Direct mode is quite unsecured (database's kdbx file may be corrupted if connection breaks during writing), and will probably fail with a permisson issue : be sure to use indirect mode ("Temporary file moved into place").
Rclone Access
Another alternative is to use RClone which supports a wide range of storages like S3, Google Drive and more.
# don't use debian 11 repository rclone
sudo -v ; curl https://rclone.org/install.sh | sudo bash
rclone config
sudo ln -s /home/alex/.config/rclone/rclone.conf /etc/rclone.conf
sudo ln -s /usr/bin/rclone /sbin/mount.rclone
# fstab
<name>: /mnt/<mount> rclone rw,noauto,nofail,_netdev,x-systemd.automount,args2env,vfs_cache_mode=writes,config=/etc/rclone.conf,cache_dir=/var/cache/rclone,uid=1000,gid=1000,umask=0022,allow-other 0 0
Using KeepassXC
Beside the normal password management you may use the following features. Find out more in the getting started guide or the user guide.
Basic Use
The layout is very easy and intuitive:
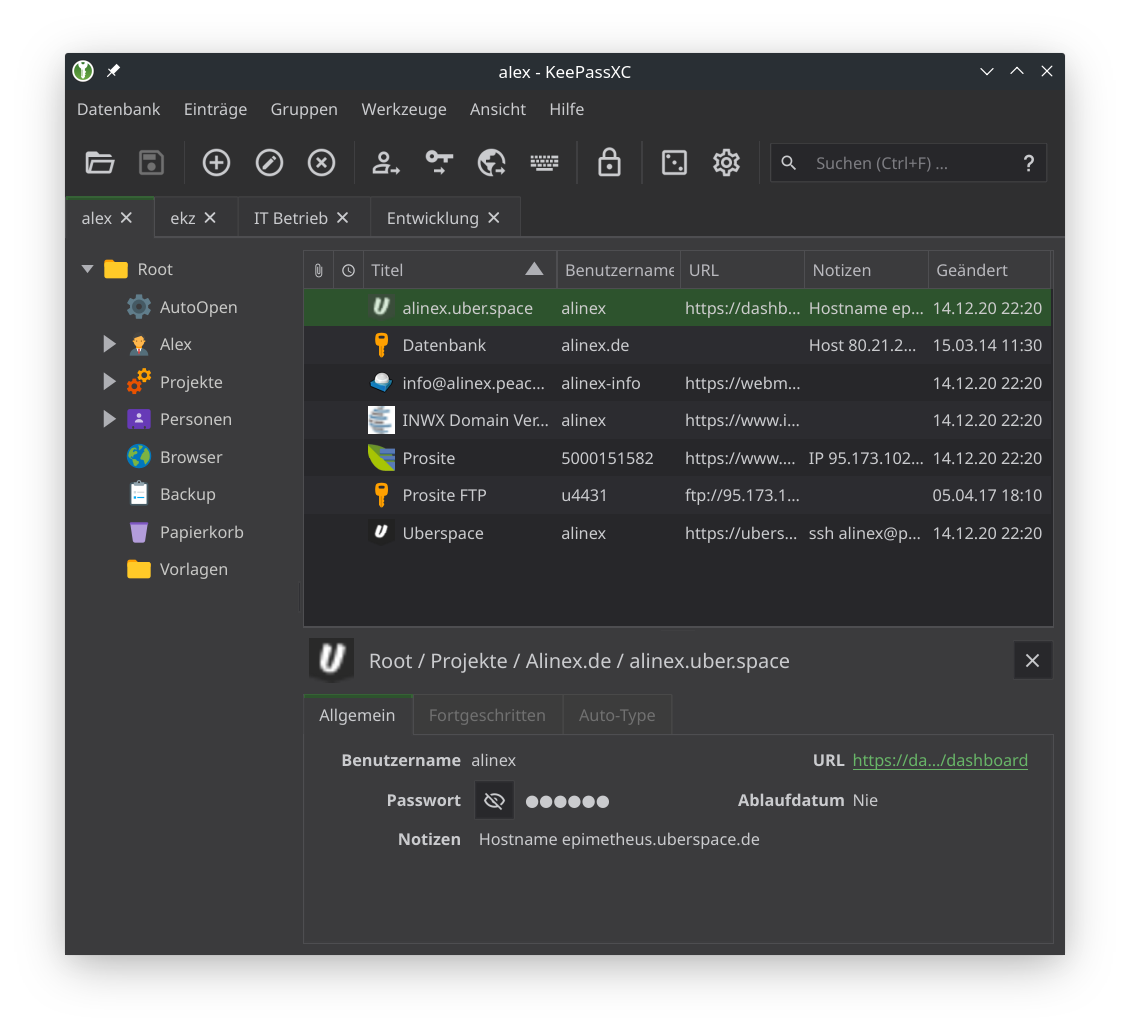
- Groups on the left to organize your entries within a deep structure to access it hierarchically. Search and autotype defaults are used from the parent entry.
- Entries contain all the information for each website or application you are storing in KeePass. This view shows all the entries in the selected group. In the context menu are multiple actions possible.
- Preview panel on the bottom shows the selected group or entry.
Shortcuts
- Ctrl+O - Open Database
- Ctrl+S - Save Database
- Ctrl+Shift+S - Save Database As
- Ctrl+Shift+N - New Database
- Ctrl+W or Ctrl+F4 - Close Database
- Ctrl+L - Lock All Databases
- Ctrl+Q - Quit
- Ctrl+N - New Entry
- Enter or Ctrl+E - Edit Entry
- Del - Delete Entry
- Ctrl+K - Clone Entry
- Ctrl+B - Copy Username
- Ctrl+C - Copy Password
- Ctrl+U - Copy URL
- Ctrl+Shift+U - Open URL
- Ctrl+T - Copy TOTP
- Ctrl+Shift+T - Show TOTP
- Ctrl+Alt+S - Trigger AutoType (I changed this in config, default is Ctrl+Shift+V)
- Ctrl+H - Add key to SSH Agent
- Ctrl+Shift+H - Remove key from SSH Agent
- Ctrl+M - Minimize Window
- Ctrl+Shift+M - Hide Window
- Ctrl+Tab or Ctrl+Page Down - Select Next Database Tab
- Ctrl+Shift+Tab or Ctrl+Page Up - Select Previous Database Tab
- Ctrl +
<num>- Select the numbered database - Ctrl+Shift+C - Toggle Passwords Hidden
- Ctrl+Shift+B - Toggle Usernames Hidden
- F1 - Focus Groups (edit if focused)
- F2 - Focus Entries (edit if focused)
- F3 or Ctrl+F - Focus Search
- Esc - Clear Search
- Ctrl+/ - Show Keyboard Shortcuts
Searching
You can search for specific values using [<modifier>][<field>:]<term> .... If the term contains spaces it has to be put in double quotes.
Modifier to be put before a term:
-- Exclude this term from results!- Exclude this term from results+- Match this term exactly (+user:alex)*- Term is handled as a regular expression term
The following fields can be searched along with their abbreviated name in parenthesis:
- Title (t)
- Username (u)
- Password (p, pw)
- URL
- Notes (n)
- Attribute (attr)
- Attachment (attach)
- Group (g)
Wildcard characters within term:
*- Match anything?- Match one character|- Logical OR (title:one|two)
Browser integration
Open the settings dialog. There you can enable Browser integration and also call the plugins for each Browser.
- Install the browser plugin.
- In Tools > Settings > Browser Integration activate: "Enable browser integration"
- Select the browsers for which you have installed the KeePassXC-Browser extension and click OK.
- Open your Browser.
- Click the KeePassXC-Browser extension icon > Connect and give it a name.
You can dive deeper into configuration and change a lot of things: Click the KeePassXC-Browser extension icon > Settings Maybe you want to:
- set shortcuts
- directly enter single matches for login
- automatic HTTP Basic Auth
- select group for new entries
- auto reconnect to KeePassXC
I use the following shortcuts:
- Alt+Shift+S - insert username and password
- Alt+Shift+C - only insert password
- Alt+Shift+O - TOTP insert
- Alt+Shift+G - show password generator
For better support you can set additional URLs for each database entry in the Browser Integration tab.
Auto Type
That is a complete separate feature from the browser integration it works universally inserting data in the current active application. The application's title is used to match the entry here. You can define for which title pattern (use * as wildcard) to work and can give individual sequences. The sequence is a text with concatenated action elements and text (default is {USERNAME}{TAB}{PASSWORD}{ENTER}).
{TAB},{ENTER},{SPACE},{INSERT},{DELETE},{HOME},{END},{PGUP},{PGDN},{BACKSPACE},{CAPSLOCK},{ESC}- Press the corresponding keyboard key{UP},{DOWN},{LEFT},{RIGHT}- Press the corresponding arrow key{F1},{F2}, …,{F16}- Press F1, F2, ... function keys{LEFTBRACE},{RIGHTBRACE}- Press{or}, respectively{DELAY=<ms>}- Set key press delay tomsmilliseconds{DELAY <ms>}- Delay typing formsmilliseconds{CLEARFIELD}- Clear the input field before typing{TOTP}- Insert calculated TOTP value (if configured){<ACTION> <num>}- Repeat<ACTION>numtimes (e.g.,{SPACE 5}inserts five spaces)
To insert fields use:
{TITLE}- Entry Title{USERNAME}- Username{PASSWORD}- Password{URL}- URL{NOTES}- Notes{TOTP}- Current TOTP value (if configured){DT_SIMPLE}- Current date-time{DB_DIR}- Absolute directory path for database file{S:<attribute>}- Value for the givenattributename{REF:<field>@<search_in>:<search_text>}- Search for a field in another entry using the reference syntax.
You can define a global Auto-Type hotkey that starts the Auto-Type process. To configure the hotkey, perform the following steps:
Navigate to Tools → Settings → Auto-Type tab and click into the Global Auto-Type shortcut box and press the desired key combination that will trigger the Auto-Type process.
Backup
Better not use a local database and make a backup in the cloud. Do it the other way round: Use the master on the cloud so that you can use multiple devices and make changes in all of them. For the safety make local backups using the menu or a shell script to do it regularly.
Multiple Databases
If you share passwords with other people it is often useful to have an extra database for each group. But while you need multiple of them you won't open each one individually. Therefore you can make one personal (master) database which contains the link and passwords to open all others automatically for you.
- Make a group called
AutoOpendirectly underRoot. - Create a new entry under
AutoOpenand give it any title you wish. - If your database has a key file, enter its absolute or relative path in the
usernamefield. - If your database has a password, enter it in the
passwordfield. - Enter the absolute or relative path to the database file in the url field like
file:///home/alex/private.kdbx. - To restrict auto open to particular devices, go to the advanced category and enter the following:
- Create a new attribute named
IfDevice. - Enter hostnames in a comma separated list to define computers that will open this database.
- Prepend an exclamation mark (!) to explicitly exclude a device and allow all other ones.
- Create a new attribute named
If you have multiple databases you also have to make multiple connections in the Browser Plugin, for each you want to use.
Further features
You may also have a look at: